Huwebes, Hulyo 31, 2014

healthy snacking : aubergine

I posted on my FB wall about harvesting a cute "Eggplant" which my colleague corrected me that it's AUBERGINE. It's one of Manang Lor's (the Manang of my cousins) plant, she has a green thumb and she grew different veggies in our little space at our subdivision. So this is my cute harvest 


My cousins - well most of them are not Veggie lovers, so it has always been a challenge for me to do recipes that will not sound/taste "yucky veggies" to them. I made a different version of this before - sort of Lasagna type - Eggplant Parmigiana, but since the veggies are so small, I made a "Pica-Pica" version of this healthy snack.

What I did was,

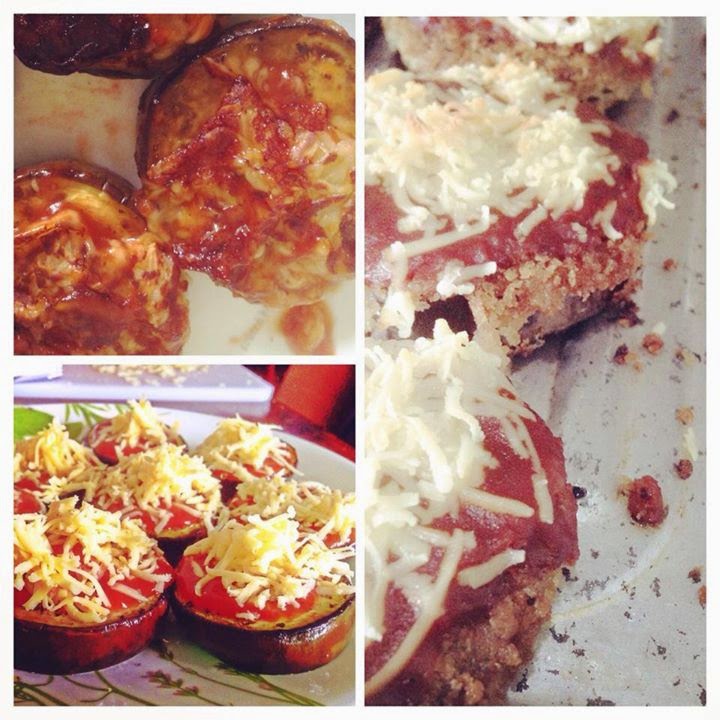
1.) I cut the Aubergine crosswise, making round cuts (or we call it Rondelle in culinary term)

2.) I did a 3 step breading procedure (dredge in flour - then dip in egg wash - then covered it with bread crumbs) for the flour, I used Crispy Fry breading mix and used Japanese Bread crumbs

3.) I deep fried the aubergine till it turned golden brown

4.) After all slices were deep fried, I let the excess oil dry on a paper towel. 

5.) Arranged the fried aubergine in an oven toaster plate, topped with a teaspoon to 1 tbsp of Tomato Sauce (you can use either pizza sauce or flavored tomato sauce - for this recipe I used Clara Ole Chunky Tomato with Basil sauce) then finish it with grated quick melt cheese. Place inside the toaster for 3-5 minutes and cook til the cheese melts)

It's a healthy snack, and seriously I was really happy when I saw my brother and 4 cousins' faces lit up when they ate it - they were amazed coz it was VEGETABLE and it tasted good (they said so!). Go try this recipe :) 

this is the finish product: 

Miyerkules, Hulyo 9, 2014

personalized cakes by Mr & Mrs Cup'N'cakes

It was almost father's day that time, when I saw a cake pic tagged to my friends. 

this was the first cake I bought from Maebelle

That certain cake pic reminded me of a certain figurine which my mom and her siblings kept for the longest time, and everytime they buy cake to remember our Lolo, that certain figurine is always placed on top of the cake (until now! one of our Sendong survivors - that figurine)

When I scanned her Facebook page to check her other cake designs, I found out that she is the wife of my neighbor Jimboy, so it was instant "FC" (feeling close). For the last 3 years, she made my mom's birthday cake - she knows what I want - fondant looking and green. It's about being comfortable about placing your orders and being too demanding on the design you want (google search!) hahahaha... but thanks Maebs - I'm always amazed with your work of art! 

Here are some of the cakes I ordered from her: 

 Mama's Golden Bday cake

  Mama's 51st bday

Mama's 52nd birthday

My inaanak's birthday cupcake

 assorted cupcake for a highschool friend's bday

Cake for our Chef instructor

cupcakes for my brother

cake and cupcakes for my inaanak's Christening

Tyra's 4th bday

my aunt's bday cake

another aunt's bday

for tyra's despedida

a bible cake for a pastor

I know there's a very thin chance for me to become a Pastry chef -- but I'm blessed to have the sweetest Pastry Chef friends who are always ready to give in to my requests! 
cupcakes for freebies!

and cookies!

if you want to check their artistic works, you can click on this link and like their page : https://www.facebook.com/pages/Mr-Mrs-CupNcakes/130325956982854


Lunes, Hulyo 7, 2014

Pane e Dolci introduces their new Sylvannas Flavors

Sylvannas are made of 2 meringue discs, filled and coated with french buttercream, and covered with crushed egg cookies. Insanely delicious! Best eaten from the chiller, fridge, or freezer! -Pane e Dolci

I'm not really a fan of anything sweet but sometimes we make exemptions. I can tolerate Dark chocolate or if it's my time of the month I crave for some sweets. I easily get tonsillitis - that's why I'm not a fan of sweets. 

I met Chef Ben when I was almost done with Culinary School and they were among the students of the recent batch (that time). It wasn't an instant friendship coz he was the shy type and a "foreigner" of the city then, who came here to work as a Nutritionist-Dietitian. When I found out that he came from the same university where I used to study - I gave him the "golden friendship" welcome -- and the rest, as they would say it - was history. We both came from the same university, went to the same culinary school and taught in the same school. When he first introduced his version of Sylvannas, he gave me sample (the perks of having Pastry chef friends -- the freebies :D)  I tasted it, and I liked it, though I can only finish a piece -- much to my cousins' delight. 


the classic - French Butter Cream

Pane e Dolci started the craze #sylvfie (the sylvannas #selfie), and of course, I posed for them! hahaha

Chef Ben went to Australia earlier this year to do further studies in Culinary Arts. He came home recently to launch the latest flavors of their Sylvannas. From the original/classic French Butter Cream - new flavors are Peanut Butter, Chocolate, Red Velvet and Nutella. 


and as always, I was among the first to do the taste test for these -- COFFEE PLEASE! Dark! I think I'll have Tonsillitis very soon! 


so here it is, the assorted Sylvannas (no, they don't sell it assorted, this is for food tasting purposes only)


My Verdict: 
*please bare with me, I'm not a fan of sweet but I did this food tasting for the love of Ben, Mark and Pane e Dolci

THEY ARE SWEET! hahaha Kidding aside

NUTELLA FLAVOR - well I guess if you are a fan of the nutella spread, you would definitely love this...very sweet and the nutella and the meringue disc melts in you mouth

PEANUT BUTTER - for one, I LOVE PEANUTS but I'm not a peanut butter fan, but this is an exemption (again), the peanuts covering the whole meringue disc is like a neutralizer, it lessens the sweetness of the peanut butter

CHOCOLATE - contrary to what you are thinking, it's not that sweet, I love how the chocolate melts in your mouth in every bite

CLASSIC - oh the classic -- hmmmm.....the classic :P

RED VELVET -- i may sound bias but I LOVE THIS FLAVORRRR!!! for one, Red Velvet cake is one of the best seller of Pane e Dolci, what I love about this flavor -- not too sweet! the cream cheese's fault! but seriously...i love thisssssss!!! this is my favorite!! hahahaha!
SYLVANNAS OVERLOAD -- with Coffee :) PERFECT PAIR!

well for one, when I did the tasting it was one flavor after the other that's why it's different flavors playing in my taste buds, thus the crazy verdict

tip: Best Paired with Black Coffee! or if it's 3in1 coffee, just drink the original flavor. 

if you want to buy these babies, you can go to this place -- as DORA WOULD SAY IT -- MAP!!! click on the link below

https://www.facebook.com/media/set/?set=a.526493010774571.1073741838.118957484861461&type=1

or you can like their Facebook page
https://www.facebook.com/pane.e.dolci

and by the way, here's a good news for you and your friends.... click on the link below to find out how you can win P10,000

https://www.facebook.com/photo.php?fbid=663592747064596&set=a.128141950609681.28594.118957484861461&type=1&relevant_count=1


i'm back

It's been 2 years since I last posted in this blog, i think the last time i even posted in my blog was 2 previous home address ago. After typhoon Sendong we rented a place for 8 months until we moved uptown. I've been a chef instructor, a saucier/prep cook in an Italian restaurant, establishment consultant, endorser to my friend's business, do a lot of cooking for a feeding program and everything in between. We won last August 2nd place for Del Monte Set menu for the Kumbira - the longest Culinary show in the country with colleagues Chef Ben Castor and Chef Allen Cassanova. Our student's for 2 straight years won second (and we're one of the youngest school then) during the Mindanao Chef's war - of course with the training they get from Chef Roseller Fiel II and Maam Shiela -- they would really get the best training there is.
 the first victory of ICI Culinary Arts for Mindanao Chef's War - Silver Medal to our Students Ming, Alex and Mike with their trainors Chef Fiel, Maam Shiela and Chef 
our Batch 1, 2 and 3 Students having fun in the kitchen
 training days in Italiannis Abreeza Mall as Prep Cook/Saucier 

                                                                                     ID For Kumbira 2013


 my Chef's uniform as an instructor

 Pizza Class with Batch 3 and my colleagues - Chef Ben, Chef Allen and Chef Fiel
 after the cooking competition for Del Monte Set Menu with Chef Ben and Chef Allen
 Pizza Class with Batch 3 and my colleagues - Chef Ben, Chef Allen and Chef Fiel
 Batch 2&3 Graduation and Batch 4 toque Ceremony 
 the night before the Mindanao Chef's War 2013, we made them cook like 2x before resting for the next day's competition, Chef Fiel was already stressed out so we made the torturing ourselves - me and Chef Allen
 Bronze medalist for Mindanao Chef's war 2013 (highest got silver) - JP Gerona, Missy Banuag and Aleana Bartolome with their proud mentors
 us on stage as 2nd placer :)
 getting ready for the graduation rites - ICI Batch 1

 the mentors and the guest speaker - Chef Lala of Dessert Strip
 graduating batch and the admin
cooking for outreach churches feeding program

 Yes, everything about me involves food :D 

I'm doing this blog - for update purposes though I really don't know the pasikot-sikot of this site :D 

Lunes, Hunyo 18, 2012

Microwave Chocolate Cupcakes

It's been a year since I last posted in my blog site, not that I stopped cooking, in fact, I've been to many challenges in my life - cooking wise. Cooking a "pica-pica" or as we call it appetizers or hors d'oeuvres in the culinary dictionary - for 300 people for our church anniversary, cooked a lot of filipino dishes "first time" - been experimenting a lot, so there's no hiatus in cooking, just the blogging. So just yesterday, I saw a post in Facebook by a Baking brand/School "Maya" about Microwave baking. Just last December I lost all my cooking and baking essentials - my kitchen stuffs, ingredients i've been storing in my cabinet(because of Typhoon Sendong) so I'm left with the good old microwave at home. Seeing the recipe posted got me excited so we did a lot of trial and error in cooking last night.

http://casaveneracion.com/microwave-chocolate-cupcakes/
so this is where we got the recipe from


Recipe: Microwave chocolate cupcakes


Ingredients

  • 8 tbsps. of cake flour
  • 8 tbsps. of white sugar (we used brown sugar)
  • 4 tbsps. of unsweetened cocoa
  • 1 tbsp. of instant coffee granules (we used 3 in 1 coffee, Nescafe Chocolate Latte for a good taste)
  • 2 pinches of salt
  • 4 tbsps. of whisked egg (that is equal to 1 medium egg)
  • 6 tbsps. of milk (evaporated milk in can)
  • 6 tbsps. of oil (we used canola oil)
  • *this particular recipe is good for 4 cups, we adjusted our recipe using half of all ingredients measurement...so it's basically 4 tbsp cake flour, etc...

Procedure:

Into each cup place 4 tbsps. of flour, 4 tbsps. of sugar, 2 tbsps. of cocoa, 1/2 tbsp. of coffee granules and a pinch of salt. Stir well to combine.
*we used 1 tbsp coffee granules since we did not use pure coffee ingredient but a 3in1 coffee

Pour in 2 tbsps. of whisked egg into each cup. Mix. The batter will look like bread dough at this point but that’s how it should be.

Pour in 3 tbsps. of milk and 3 tbsps. of oil into each cup. Mix until smooth. Now you have cake batter that looks like regular cake batter.

Bake on HIGH for two and a half minutes. One cup at a time. I don’t know how the cakes will turn out if you cook two cups at the same time.
*the first time we did it was a failure because of the following (please avoid doing this) 
1.)we used a microwavable plastic cups and the high temp melted the base part -- so use the china cup with "microwave safe" label 
2.)adjust temp from high to 400 watts, and time 2 minutes to 5 minutes
    
                                                   the first attempt : hard and burned!
            remaining of the 1st batch of batter : now in china cup and adjusted the time and temp
                        the inside part of the cupcake, still using the first batch of batter
 the best batch! used the china cup, time : 5 mins, 400 watts and used Nescafe Chocolate Latte instead of plain coffee granules
 
Once the cake is out of the microwave, just take a dessert spoon and dig in.
*don't let it cool for a long time since the cupcake becomes rubbery, taste best if from the microwave

By the time I was almost finished with my cake, I discovered that the bottom was still slightly wet. That was fine with me. But if you prefer not to have that slightly wet bottom, you might want to increase the baking time by another 30 seconds.

Preparation time: 5 minute(s)
Cooking time: 2 minute(s) per cup (ours was, 2 cups for 5 minutes, 400 watts)
Number of servings (yield): 2 (half of the ingredients stated above for 2 cups)

Linggo, Hulyo 24, 2011

Chocolate Mousse

got this recipe from this site (http://www.davidlebovitz.com/2008/05/perfect-chocola/), a Julia Child's Perfect Chocolate Mousse. i just copied and pasted the recipe

6 ounces (170g) bittersweet or semisweet chocolate, chopped 
*i used a dark choco couverture chocolate, the result is too sweet, you may use the store bought chocolate, the 70% cocoa or something, or im thinking something like tablea
6 ounces (170g) unsalted butter, cut into small pieces
1/4 cup (60ml) dark-brewed coffee
*i used 3 tbsp coffee with the bigger granules, not the one with finer granules, i find it too strong...so you may scale it down, like 2 tbsp
4 large eggs, separated
2/3 cup (170g), plus 1 tablespoon sugar
*maybe 1/2 cup will do, well maybe because I was using a not-so-dark-choco thats why the mousse i made is too sweet
2 tablespoons (30ml) dark rum
*i texted our pastry Chef, and he suggested the Tanduay Dark rhum, i love the bite it had on the mousse
1 tablespoon (15ml) water
pinch of salt
1/2 teaspoon vanilla extract

1. Heat a saucepan one-third full with hot water, and in a bowl set on top, melt together the chocolate, butter and coffee, stirring over the barely simmering water, until smooth. Remove from heat.

2. Fill a large bowl with ice water and set aside.

3. In a bowl large enough to nest securely on the saucepan of simmering water, whisk the yolks of the eggs with the 2/3 cup of sugar, rum, and water for about 3 minutes until the mixture is thick, like runny mayonnaise. (You can also use a handheld electric mixer.)

3. Remove from heat and place the bowl of whipped egg yolks within the bowl of ice water and beat until cool and thick, as shown in the photo above. Then fold the chocolate mixture into the egg yolks.

4. In a separate bowl, beat the egg whites with the salt until frothy. Continue to beat until they start to hold their shape. Whip in the tablespoon of sugar and continue to beat until thick and shiny, but not completely stiff, then the vanilla.

5. Fold one-third of the beaten egg whites into the chocolate mixture, then fold in the remainder of the whites just until incorporated, but don’t overdo it or the mousse will lose volume.

6. Transfer the mousse to a serving bowl or divide into serving dishes, and refrigerate for at least 4 hours, until firm.
Serving: I like to serve the chocolate mousse as it is, maybe with just a small dollop of whipped cream; it neither needs, nor wants, much adornment.
*you can make white choco shavings for the garnishing, i didn't have much time so i just used a small white choco bar for the garnishing

Storage: The mousse au chocolat can be refrigerated for up to 4 days.
 the mousse is the one in the middle, the smaller cups with mango balls are mango float

Biyernes, Hulyo 15, 2011

Lemon Cake

I had like 6 pcs of Lemons inside the ref and I didn't know what to with it, went online and found this recipe from Martha Stewart's site (http://www.marthastewart.com/284345/lemon-cake-recipe), so I made it and by the time the cake was ready, my uncles, mom and cousins gathered at the table to have an afternoon coffee :)

by the way, I did a copy and paste from the link above


Ingredients

  • 1 cup (2 sticks) unsalted butter, room temperature, plus more for pans
  • 2 1/2 cups all-purpose flour (spooned and leveled), plus more for pans
  • 1/2 teaspoon baking powder
  • 1/2 teaspoon baking soda
  • 1 teaspoon salt
  • 1 tablespoon lemon zest
  • 2 cups sugar
  • 2 large eggs plus 3 large egg yolks
  • 1/4 cup plus 2 tablespoons fresh lemon juice
  • 1 cup low-fat buttermilk
  • 1 lemon, thinly sliced and seeded

Directions

  1. Preheat oven to 350 degrees. Butter and flour two 8-by-2-inch cake pans, tapping out excess flour. In a medium bowl, whisk flour, baking powder, baking soda, salt, and lemon zest.
  2. In a large bowl, using an electric mixer, beat butter and 1 1/2 cups sugar until light and fluffy. With mixer on low, beat in eggs and yolks, one at a time. Beat in 2 tablespoons lemon juice. Alternately beat in flour mixture and buttermilk beginning and ending with flour mixture; mix just until combined.
  3. Divide batter between pans; smooth tops. Bake until cakes pull away from sides of pans, 32 to 35 minutes. Let cool in pans 10 minutes. Run a knife around edges of pans and invert cakes onto a wire rack.
  4. While cakes are baking, bring remaining 1/2 cup sugar and 1/2 cup water to a boil in a saucepan. Add lemon slices and simmer 25 minutes. Using a slotted spoon, transfer lemon slices to a waxed-paper-lined plate. Stir remaining 1/4 cup fresh lemon juice into syrup.
  5. Using a toothpick, poke holes in warm cakes on rack. Brush with lemon syrup. Let cool completely. Prepare frosting, substituting 2 tablespoons fresh lemon juice for vanilla extract. Frost cooled cakes and top with candied lemon slices.

Lemon Whipped Frosting

Ingredients

  • 3 large egg whites
  • 3/4 cup sugar
  • Pinch of salt
  • 1/3 cup water
  • 2 tbsp lemon juice

Directions

  1. In a heatproof bowl set over (not in) a saucepan of simmering water, combine egg whites, sugar, salt, and water. Cook over medium, stirring constantly, until sugar has dissolved (or mixture registers 150 degrees on an instant-read thermometer), 2 to 3 minutes. Transfer to a large bowl. Using an electric mixer, beat on medium-high until glossy, stiff peaks form (do not overbeat), about 3 minutes; reduce speed to low, add vanilla extract, and beat just until combined. Use immediately.